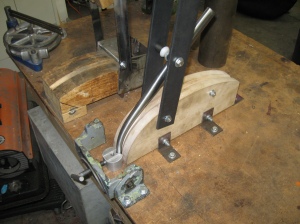
I went over to see the guys at Circle A as Brian had finished fabricating the fork bender and I wanted to see the test results. Brian had made some changes as he had an old part that he could modify to act as the fork tip restraint:
Overall, I’d say the results are excellent for the first bend, though the blade wasn’t bent all the way to the tip.
Since the restraint needed to be mounted to the table, Brian raised the block up off the table a little so he wasn’t grabbing the very tip of the blade. Additionally, he forgot to install the bracket that holds the end of the mandrel in place. Combined with the fact that the restraint is no longer tied to the block directly, this allowed the block to move a little relative to the restraint. As a result, you can see that while the blade is beautifully bent, with no rippling or bending in the upper portion of the blade, the tip of the blade is not bent as it raised a bit off the block.
Installing a base so that the block isn’t flying in the air and installing an angle iron at the end should fix things, but if there is still movement, he can install a strap that ties the block directly to the restraint, somewhat like the original drawing, but perhaps a bit lighter since he has the restraint bolted to the table and all he needs to do is prevent them from separating.
Here is the blade:
and another shot of the complete bender:
I suggested a couple of slight mods to fine tune the power of the arm, but Brian says he can easily bend the blade with one hand.
Hoohah!


Very nice but the bend is too far up the blade for my taste. In fact looking at the photo I’m surprised that bend came from that mandrel. It looks like it should have started much further down. But it’s a nice bender. How did you stop the blade collapsing at the bend?
AS noted in the post above, there was some movement of the mandrel. additionally, he puts a plug in the tip of the blade to prevent it being crushed by the clamp. The straight part at the end gets trimmed off. Not sure how much further down the blade he’s been able to get the bend.
He fills the blades with sand to prevent rippling.
I realize this is an old post but I’m finding your information quite helpful. I built a similar bender this past weekend and like you, learned that the method for securing the tip is a critical aspect of the tool. Fortunately, I do this as a hobby and can afford to waste a couple blades dialing in the tool. Many thanks, Mike